- Time Limited Offer: Get $20 OFF for Windows Password Recovery Advanced Get It Now >>
How to Remove Forgotten Login Password in Windows 10

How to Reset Windows 7 Password with USB Password Reset Disk
May 9, 2018How to Create and Use a Password Reset Disk in Windows 10
June 30, 2018Having a password on our computer with Windows 10 increases the security of the data it contains, but sometimes the Windows password is easily forgotten, if you happen to encounter such a problem, you must want to remove this password and never want to set a password for your computer again. Therefore, we will show below how to remove the forgotten login password in Windows 10.
To remove the login password in Windows 10 we can follow several different methods, so we will indicate the steps to perform in each of them:
Method 1. Remove Windows 10 Login Password with Windows Password Recovery Tool
The easiest way to remove Windows 10 login password is to use a third-party software, here we recommend Windows Password Recovery Tool, which is a tool specifically designed to remove Windows password. It only removes Windows 10 password from the user account and does not run any operation on the operating system settings and your personal files. The program will create a Windows password reset disk to reset Windows 10 password, so if you already have a password reset disk before, you can directly turn to Method 2.
Key Features:
- It can recover forgotten password for all Windows in a few minutes.
- It can create a new administrator account easily without logon.
- It can create USB flash drive disk or CD/DVD Disc.
- Support Windows 10, 8.1, 8, 7, Vista, XP, 2000, NT.
- Support Windows Server 2016, 2012, 2008(R2), 2003(R2), 2000, NT.
Step 1. Download and install Windows Password Recovery Tool on an accessible computer.
Step 2. Create a Windows password reset disk.
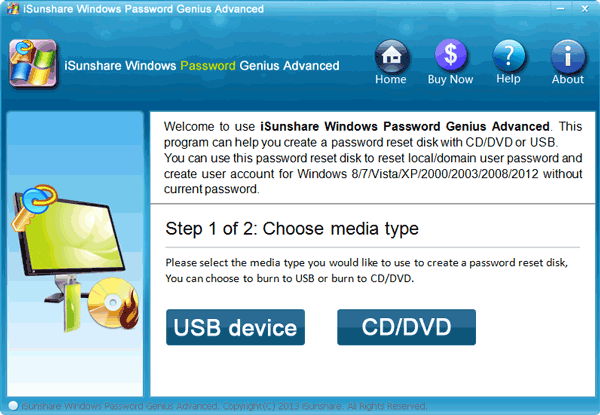
Take USB flash drive as an example (You can also use the CD/DVD). Insert an empty USB flash drive to your computer, choose the USB on the software, and then click Begin Burning button to make a password reset disk.
Step 3. Boot the Windows 10 computer from password reset disk.
After the Windows password reset disk is created successfully, unplug it and insert it to the Windows 10 computer you want to remove password, restart the computer and set it boot from USB flash drive.
Step 4. Remove the Windows 10 Password
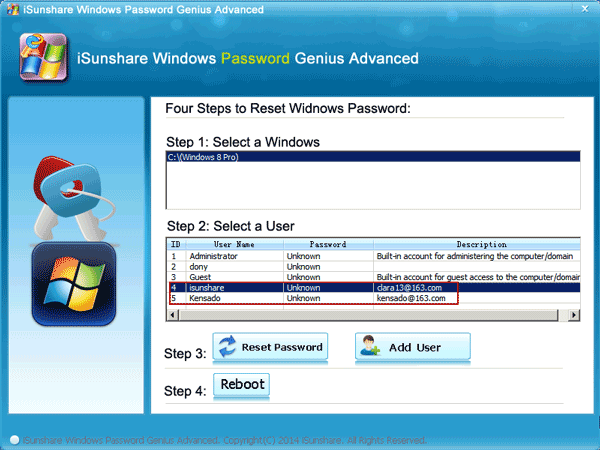
After your computer boots from USB. You can select a Windows system and a user account, and then click Reset Password button to set the password to blank (Remove it) for the selected user account.
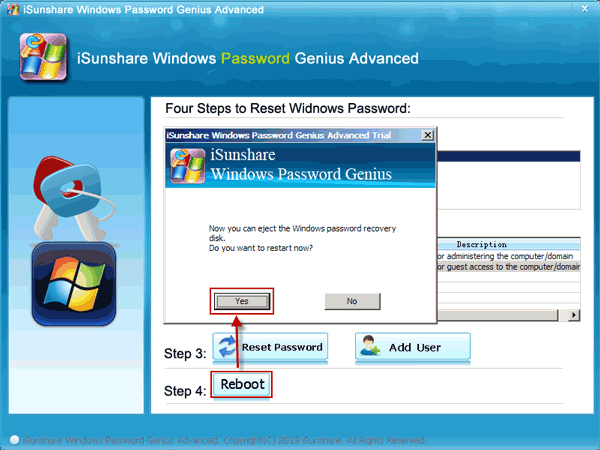
Step 5. Click Reboot, click Yes and eject password reset disk to restart the Windows 10 computer. You will see you can don’t need to type in any password to access computer.
You may also like: How to Change the Login Password in Windows 10
Method 2. Remove Windows 10 Login Password with Created Password Reset Disk
If you have created a Windows 10 password reset disk before, you can remove Windows 10 forgot password with this password reset disk directly. All you need to do is to follow the instructions that appear on the screen when you insert it into your PC. For example, select the disk you plug and don’t set any new password for this user. At last, Windows password has been removed successfully. Just exit the disk and get into the locked computer without password.
Extra Tip. How to Remove Windows 10 Password With Known Password
Although many users prefer to protect their computer with a password, many others prefer not to enter a password every time they turn on the computer, especially if they are the only one who use the computer and do not share it with other people. So here we will tell you how to remove Windows 10 password with known password.
Remove Windows 10 Password in Netplwiz
Type “netplwiz” without the quotes in the search box and click Enter. There you will find additional options for existing user accounts.
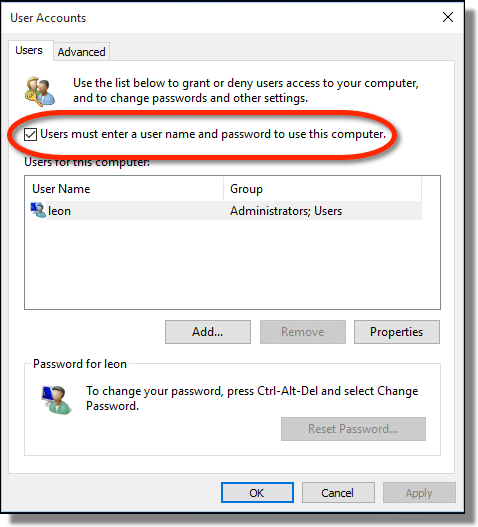
Specifically, you will see that in the upper part of this new window there is a checkbox marked “Users must enter a user name and password to use the computer”. Logically, our first step will be to uncheck this box and give it to accept, so when we turn on our computer it is no longer necessary to enter a password to enter Windows 10.
Prevent Windows Asking for a Password on Wake Up from Sleep/Standby
If we have followed the steps of the previous section it will no longer be necessary to enter a password in Windows 10. But if we want to access our PC from Sleep/Standby we will still be asked to identify ourselves.
To prevent Windows 10 from asking us for the user password after a system Sleep/Standby, we will have to access the Configuration options available in the Start menu. From here click on the Accounts category, and then select “Sign-in options”.
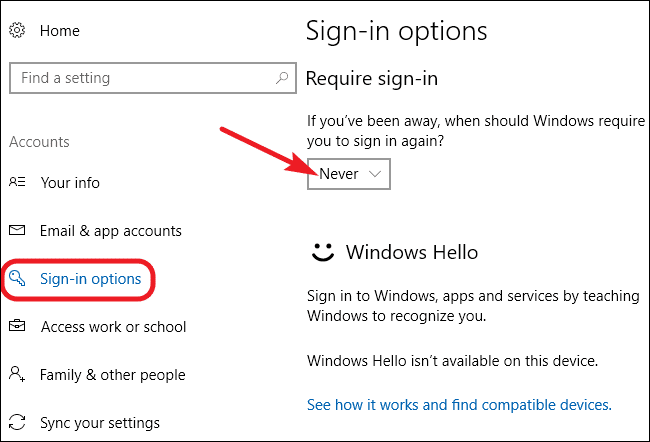
It only remains to select the option “Never” in the first drop-down that can be seen in the attached image, and our preference will be automatically saved. However, if you have a Microsoft account instead of a local account, this preference will not help and you will still be prompted for the password after a Sleep/Standby.
Create a local account
The only way to prevent Windows 10 from asking you to enter your password after a Sleep/Standby is to convert your Microsoft account into a local account. If you want to do it, you will have to go to the Settings options of the Start menu, and access the Accounts category.
Almost at the beginning you will see a colored text that says “Sign in with a local account instead”. The system will ask you to identify yourself again to verify that you are the owner of the account.
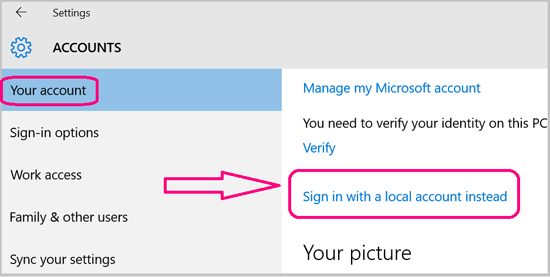
When the transformation to the local account is completed, this account will logically continue to keep the password you had before. You will have to return to the account settings, and in the section “login options” click on the “change” button to change your password.
Again you will have to type your current password, but when you ask for the new password, leave both spaces blank. Then you will not have to worry about rewriting your password to log in to Windows 10.
Free Download Buy NowRelated posts
Laptop Password
- Reset Forgotten Password on Samsung Laptop
- Reset Toshiba Laptop Forgotten Password
- Reset Administrator Password on Dell Laptop
- Reset Lenovo Laptop Password on Windows
- Unlock HP Laptop without Password
- Reset Sony Vaio Laptop Forgot Password
- Unlock Acer Laptop Forgot Password
- Unlock Dell Inspiron Laptop without Password
- Reset Gateway Laptop Password on Windows 7/8/10
- Unlock Asus Laptop Forgot Password without Disk