- Time Limited Offer: Get $20 OFF for Windows Password Recovery Advanced Get It Now >>
Windows 10 No Login Screen or Screen Not Showing. How to Fix
Forgot Word Document Password? How to Break Password on Word Doc
September 29, 2019How to Find My Microsoft Office Product Key after Installation
October 10, 2019Windows 10 has so many features for security because the current state of the cybersecurity warfare is nothing to overlook. However, what many users overlook is the aspect of securing their computers locally from unwanted access. Your first line of defense in this case is the Windows login screen. You probably found this article because your Windows 10 login screen not showing. This is worrisome, because with this, you cannot click on anything, and the machine gets practically useless. Well, that was before you found this guide.
Thanks to several software challenges, the Windows 10 login prompt does not appear sometimes. If Windows 10 no login screen on startup, or Windows 10 no login screen after sleep, you won’t have access to the machine, and that’s something to worry about. However, do not worry too much, as solutions to your headache are contained in this blog. By the time you finish reading this piece, you will be equipped with 5 working tips to fix a computer on which Windows 10 login prompt does not appear.
This problem can be a result of software conflicts, malfunctioned boot settings, login screen errors, or other random cause. We will explore all of them in this article and show you quick tips, guides, and a tool for getting your Windows 10 login screen back.
- Tip 1. Restart Windows 10
- Tip 2. Boot into Windows Safe Mode
- Tip 3. Create a New User Account in Safe Mode
- Tip 4. Rebuild Windows Boot Options
- Tip 5. Startup Repair
Tip 1. Restart Windows 10
Whenever there is an issue with your electronic, especially computers, banging the device may work sometimes, but it’s not a viable solution.
I advise that you begin from the simplest solution and work your way up to the most complex, because you don’t want to jump right to some complicated fix and land in bigger trouble for something an easier step could have resolved.
If your Windows 10 login screen not showing, restarting a computer is usually your first line of action when you encounter challenges with software, and this also applies to when there is Windows 10 no login screen after sleep.
You can restart your Windows 10 using several different ways, but if you cannot access your login screen, the only way to restart the computer is to do a force restart.
Performing a hard reset is not always advisable as you can lose unsaved work or break some processes, but on this occasion, it’s the only way out. To do this, press and hold the power button until the laptop goes completely off.
Some laptops make a hissing sound when you put them off by pressing the power button. When the machine is off, press the power button again to start the PC. If after restarting the Windows 10, no login screen or screen not showing still, go ahead to Tip 2.
Tip 2. Boot into Windows Safe Mode
Another fix for Windows 10 no login screen on startup is to boot your computer into safe mode. Safe Mode allows your machine to boot and get into Windows with the minimal required software and no drivers. Safe Mode is usually used for troubleshooting Windows computer hardware, and here, we will tor Here’s how:
Step 1: Turn on the computer. When the system boots, press and hold “Shift.” While holding SHIFT, click “Restart.”
Step 2: Next, hit “Troubleshoot” to launch the Windows Troubleshooter.
Step 3: Click “Advanced options” and the Advanced options screen will open. Proceed to the next step after this.

Step 4: Next, on the Advanced options screen, click on “Startup Settings.” These settings contain crucial options that allow you control how your computer loads Windows.
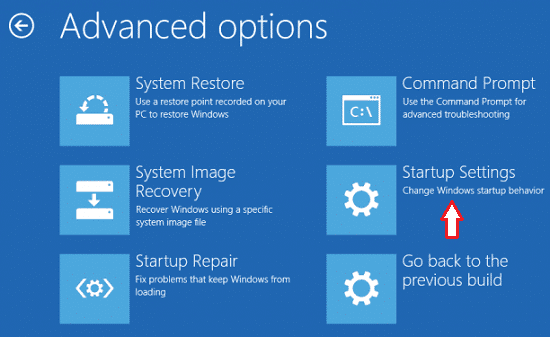
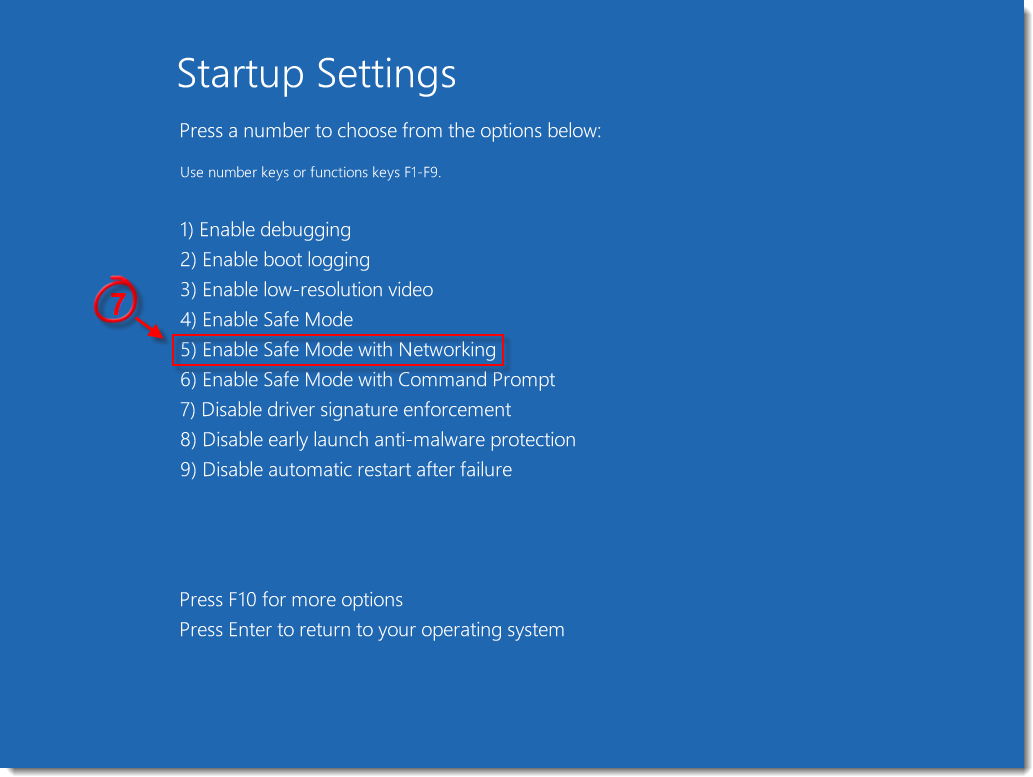
Step 5: Move the cursor to “Restart” and press “Enter.” After this, you will be presented with options for restarting the computer. Press “4”(Not “5”) to boot your computer with Safe Mode.
Tip 3. Create a New User Account in Safe Mode
Once in Safe Mode, you can as well fix this issue by creating a new user account. If the problem of Windows 10 login not showing is from the user account itself, this tip helps you get another user account to which you can use instead.
Wondering if it is possible to create a new account in Safe Mode? The answer is YES, you can. To be sure you do not do something wrong, please create the new user account in Safe Mode by following the steps below:
Step 1: Boot into safe mode following the guide in Tip 2.
Step 2: Next, press the Windows key and “I” simultaneously to launch System Settings.
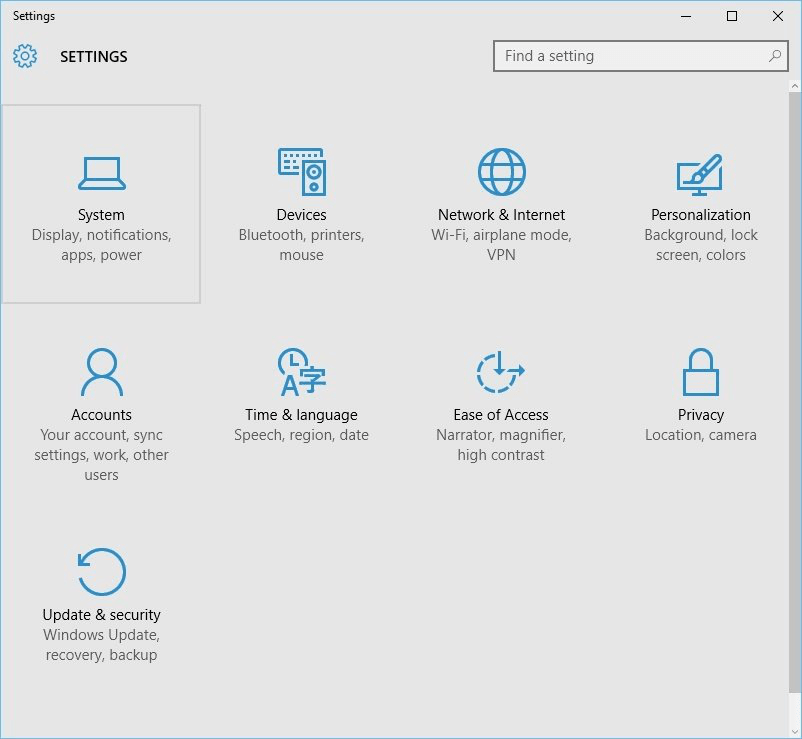
Step 3: From the System Settings window, click “Accounts.”
Step 4: Locate “Family & other users” on the left panel and click it.
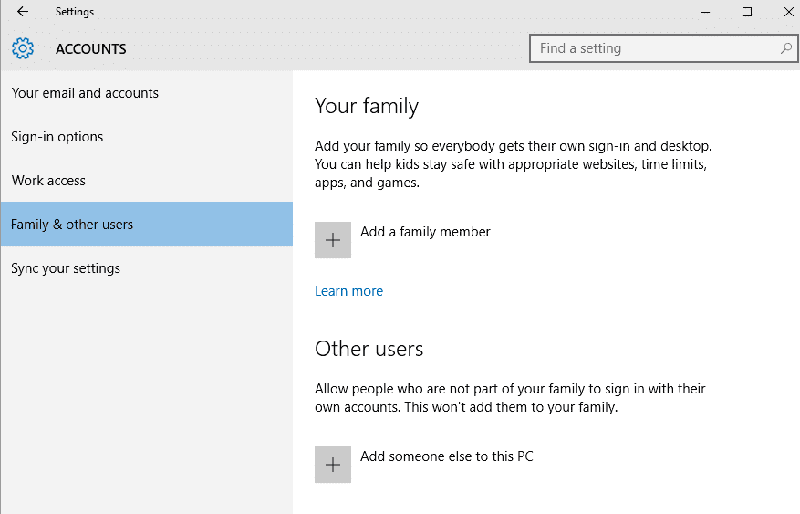
Step 5: After that, follow the onscreen instructions to register the new user account together with a new password.
Tip 3.1. Alternative: Create a New User Account with Windows Password Recovery
Windows Password Recovery is a well-known program for resolving the issue of Windows 10 no login on startup, and for this tip, we will let you know more about this software, its features, and how to use it. This guide is for Windows 10 users, but for the records, Windows Password Recovery works perfectly on all Windows OS versions, on your regular personal computer as well as for servers.
It is completely free to use but the free version has its limits. Still, from all the software on this list Windows Password Recovery is the undisputed winner is many aspects, such as speed, affordability, functionality, and ease of use.
With the above methods, you risk missing a step and ruining the entire operation, which can lead to a more severe damage. To avoid this and make the job pretty easier and faster, use a software. There are a few out there, and our pick is Windows Password Recovery .
Key Features:
- Easy to use even without tech knowledge. All the steps can be grouped into three major steps.
- Fast way to fix the issue where Windows 10 login prompt does not appear. Windows Password Recovery has the fasted data recovery speed.
- This robust and feature-packed Windows Password Reset tool does not only reset passwords. It can also be used for other tasks like creating or deleting user accounts.
- Free to try, but note that the free version has some minor limitations.
- Windows Password Recovery does not only fix the challenge when Windows 10 login screen not showing. It is also compatible with other versions of Windows – Windows 10/8/8.1/7/vista/XP/2016/2012/2008/2003/2000 as well as all Windows Server versions.
- Can also delete a user account without entering a password on the login screen.
How to use it – Detailed Steps:
Step 1: Download Windows Password Recovery and install it on the computer whose Windows 10 login screen not showing. Windows Password Recovery comes in four different packages – Standard, Professional, Advanced and Raid. Install the most ideal for your situation, launch it, and proceed to step 2 where you create a Windows password reset disk or USB.
Free Download Buy NowStep 2: Next, you create a Windows password reset disk. This step should be performed on a computer that you can access, and not the one that the Windows 10 login prompt does not appear. To create the Windows password reset disk or USB, you do not require any additional tool or software. No need to look elsewhere, you can create this with Windows Password Recovery following the guide below:
1. To create a USB password reset disk, click “USB device.” For a CD/DVD password reset disk, click “CD/DVD.”
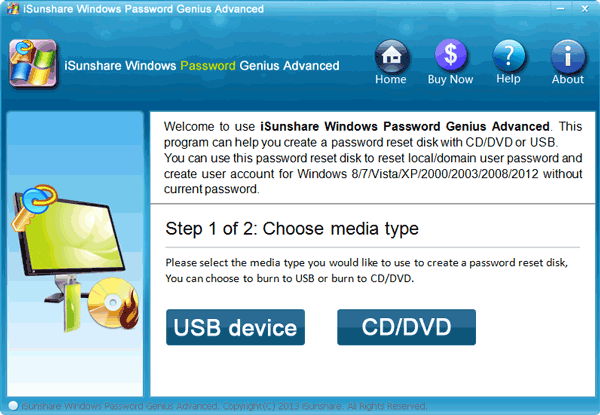
2. Insert a writeable CD or DVD and click “Begin burning” to make the CD/DVD disk. For USB, plug in the USB password reset media and click “Begin burning.”
Step 3: Now, insert or plug in your password reset media, and then, you need to configure your locked computer to boot from your password reset media. Follow the brief guide below to learn how:
1. Start your PC and press your BIOS entry key continuously until you get into the BIOS. The BIOS entry key differs from computer to computer and from manufacturer to manufacturer as well as model to model. When the computer is booting, it usually displays the BIOS entry key around the bottom of the screen.
2. The BIOS is normally void of any graphical user interface, so you navigate options and tabs with your arrow keys, and to select an item, press “Enter.” When you get into the BIOS, navigate to the “Boot” tab or section by using the arrow keys. When you get to the Boot tab, proceed to the next step.
3. Find your connected or inserted password reset media from the list and move it to the top of the list using the “+” and “-“ keys. The instructions are usually given on the right-hand side of the screen or at the bottom, depending on the version of BIOS and your computer manufacturers.
4. When your Windows password reset disk or USB media is at the top of the list of boot devices, press “F10” to save the settings. Without this, all your settings will be lost.
5. Hit “Enter” to save again and exit the BIOS. If you made a mistake and do not want to save, press “ESC” and when prompted, select “Exit without saving.”
Step 4: Power on the locked computer and boot it from the Windows password reset disk you created. To do this, make sure you have first configured your computer to boot from the password reset disk.
Step 5: Now, you add the new user to Windows using Windows Password Recovery. Allow the program to start up until you get the screen below.
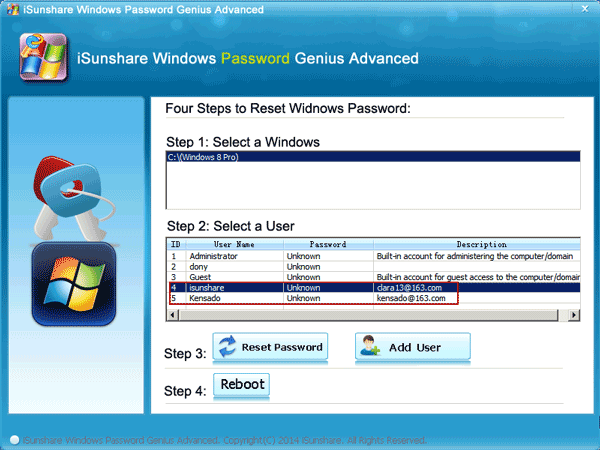
When you get to this screen, you then have to follow the steps below to create the new user account.
1. On the first section of the Window labeled as “Step 1: Select a Windows,” click on the operating system to work on. In this case, we select Windows 10.
2. From section labeled “Step 3,” click on the “Add User” button to create the new user account.
When adding the new user account, Windows Password Recovery asks you to enter a username and password as shown in the screenshot below.
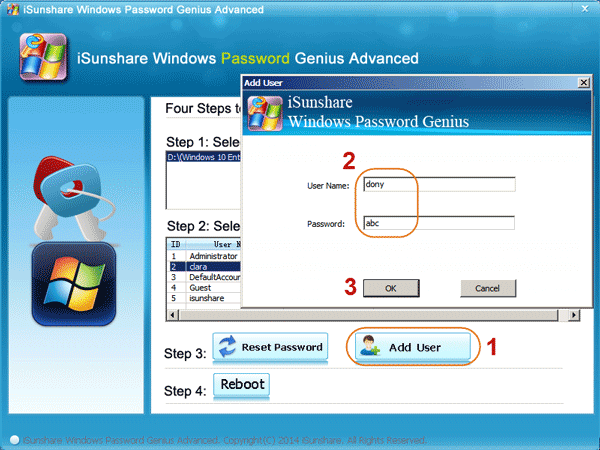
In the field for Username, input your preferred username, and in the field for password, enter your chosen password. Click “OK.”
3. Finally, after entering your desired username and password and clicking “OK,” click “Reboot.” You will then get a prompt warning you to eject or unplug the Windows password reset disk or USB from the computer before rebooting it. following this prompt, remove the password reset media and click “Yes” to restart the machine.
After rebooting, you can now log into Windows from the new user account you just created. You can also use this software to reset Windows 10 password with ease.
Tip 4. Rebuild Windows Boot Options
If none of the above solutions has worked for you, you cannot rule out the possibility that the problem generated due to a malfunctioning Windows boot. This usually fixes the challenge of Windows 10 no login screen after sleep. If that’s the case, we will attempt to rebuild the Windows boot options follow these steps:
Step 1: Launch Safe Mode with Command Prompt. To do this, follow the steps in Tip 2, but in step 5, instead of pressing 4 to boot to Safe Mode, press 6 to launch Safe Mode with Command Prompt.
Step 2: Enter the following commands in the Command Prompt window. Enter it line by line and press Enter after every line.
Bootrec/rebuild bcd
Bootrec/fixMBR
Bootrec/Fixboot
Step 3: Finally, restart the machine. You can press and hold the power button to force shut down the computer, the press the power button to boot it.
Tip 5. Startup Repair
Several startup malfunctions can cause the Windows 10 login screen not showing. If restarting your computer, booting into Safe Mode, creating a new account working from Safe Mode, rebuilding your Windows boot options, and our recommended software do not perform the magic, you have one other method to explore. So, lastly, we will have a go at repairing startup. If none else has worked, this has to be the culprit.
Step 1: Boot your computer into Safe Mode. If you are not sure how to boot your system into Safe Mode, then refer to and follow the steps in Tip 2.
Step 2:Press the Windows key and search for “Control Panel.” Before you finish entering the search terms, the Control Panel app will come up on the suggestion lists. Click it to launch Control Panel.
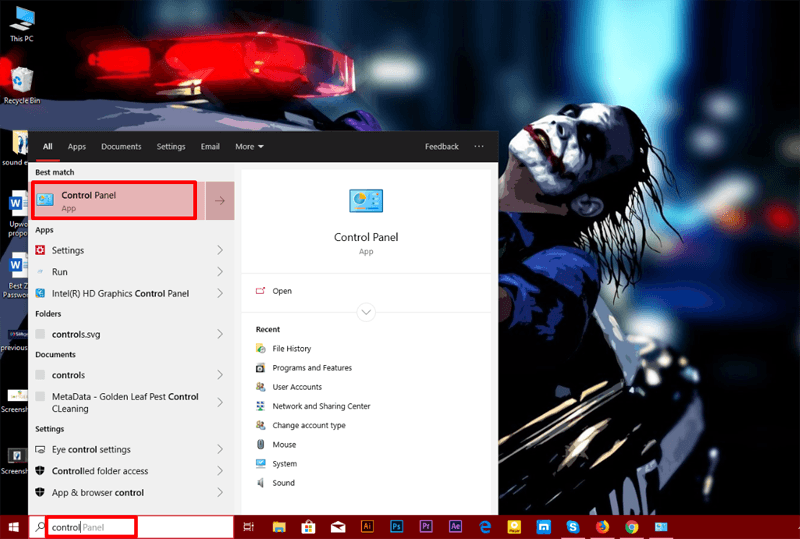
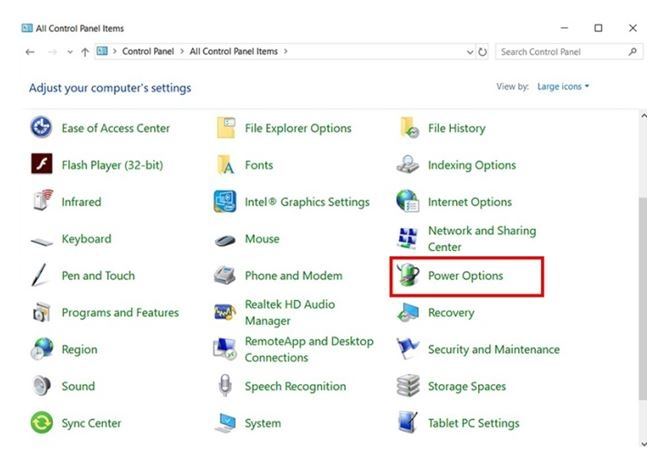
Step 3: Locate and click “Power Options” from Control Panel. Power Options should have an icon of a charging battery, you can’t miss it.
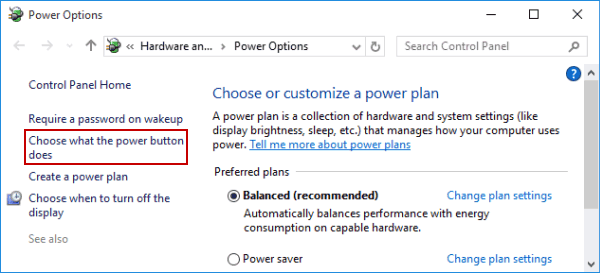
Step 4: From the left panel, click “Choose what the power buttons do.”
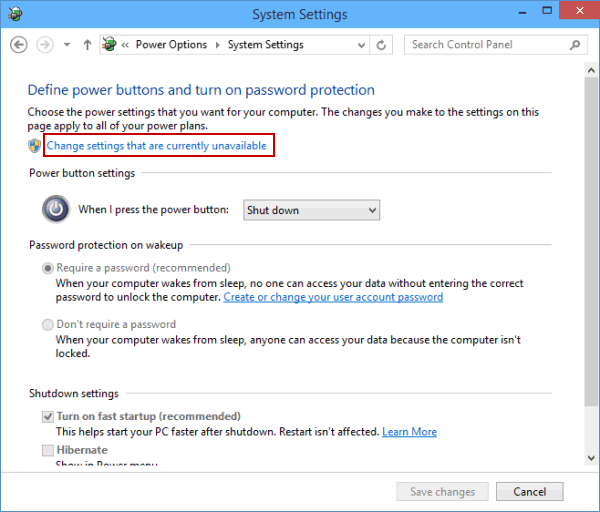
Step 5: Check “Shutdown.” If Windows does not let you, click “Change settings currently unavailable.”
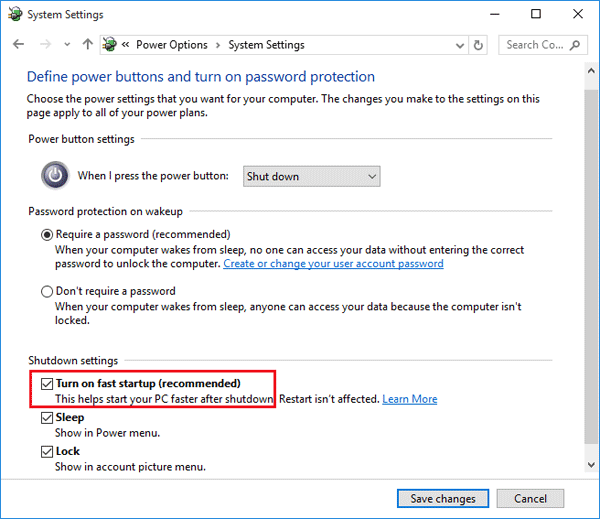
Step 6: In the next window, make sure than the “Turn on fast startup” option is unchecked. If it is, check it. Then, save the changes.
Step 7: Exit Safe Mode and reboot your machine. Just let it boot, and wait till you get to the Windows 10 no login screen on startup. This time, the login screen will show up. Enter your credentials and use your system.
Conclusion
Congratulations for getting to this point (hopefully, you didn’t have to and got your problem solved from the first or second tip). To recap, this post explored several ways of fixing the odd issue where Windows 10 login screen not showing. We went over the fixes: restarting your computer, booting into Safe Mode, creating a new user account in Safe Mode, rebuilding the boot options, repairing your startup, and finally, we recommended that you make user of the third-party software – Windows Password Recovery, which is the best Windows 10 password reset tool. If none of these tips work for you, feel free to contact us or leave a comment here and we will get to you.
Free Download Buy NowRelated posts
Laptop Password
- Reset Forgotten Password on Samsung Laptop
- Reset Toshiba Laptop Forgotten Password
- Reset Administrator Password on Dell Laptop
- Reset Lenovo Laptop Password on Windows
- Unlock HP Laptop without Password
- Reset Sony Vaio Laptop Forgot Password
- Unlock Acer Laptop Forgot Password
- Unlock Dell Inspiron Laptop without Password
- Reset Gateway Laptop Password on Windows 7/8/10
- Unlock Asus Laptop Forgot Password without Disk