- Time Limited Offer: Get $20 OFF for Windows Password Recovery Advanced Get It Now >>
How to Unlock Cells in Excel
How to Reset Windows Server 2008 R2 Password If Forgot
March 25, 2019Top 13 Best WinRAR Password Remover (Software/Online)
April 5, 2019The Internet world has made it essential to make everything password protected, from your user accounts to software files, everything needs to be just secured from the prying eyes. So if you want to save your stuff from the internet make things password protective. Similarly, Worksheet tools like Microsoft Excel also provide you a feature from where you can either protect your whole worksheet file or just the cells content in them. The protection of cell content in Excel itself a feature which is not usually for the security purpose as it’s not actually used to disable the user from accessing the data but commonly used to prevent users from accidental data change or loss of content in the cells. However, you may also want to unlock unprotect cells in Excel if you receive a protected one from a user. So, in this article, I will guide you on how to unlock cells in Excel with the best solutions out there.
- Why do people want to unlock cells in excel?
- Method 1: Unlock Cells in Excel with Zip Software
- Method 2: Unprotect Cells in Excel using VBA software (For 2010 and lower)
- Method 3: Unprotect Cells using Excel Password Recovery tool
Why do people want to unlock cells in excel?
Microsoft Excel allows you to protect your cells of the worksheet to prevent the chances of any data loss or change, but on the contrary, Microsoft has made unprotecting a cell in Excel even easier. But why people even want to unlock cells in excel is the real question. Well, if some user receives a document that is protected might want to view the document to make changes or wants to fix an error in the worksheets have to have access to the protected cells in order to make these modifications. Microsoft allows you to lock the Excel worksheet cells by default just to protect the worksheet from getting altered or modified by another user. As it is not considered as a security feature, unlocking cells in excel is an uncomplicated process. Here are some of the methods from which you can unprotect cells in Excel.
Method 1: Unlock Cells in Excel with Zip Software
The Microsoft Excel allows you to protect your worksheet file and if you have received a file that is password protected then you might have to take the password from the user in order to access it or you can use any recovery tool. If you received an excel file that is non-password protected but its worksheet cells are locked then you can use this method to unlock cells in Excel file.
Step 1: You must have a zip file opener in order to unlock cells in Excel with a Zip software. So go on download and install the 7-Zip software on your PC.
Step 2: Now Change the Excel file extension to .xlsx if it has been saved as a .xls format. In order to do so just open your Excel file and save it as (filename).xlsx. If your files are already saved in .xlsx extension format then move to the next step.
Step 3: Now you have to change the file name extension to .zip. After changing to .zip file extension, you may receive a Rename prompt message asking for confirmation. Just click Yes to proceed.
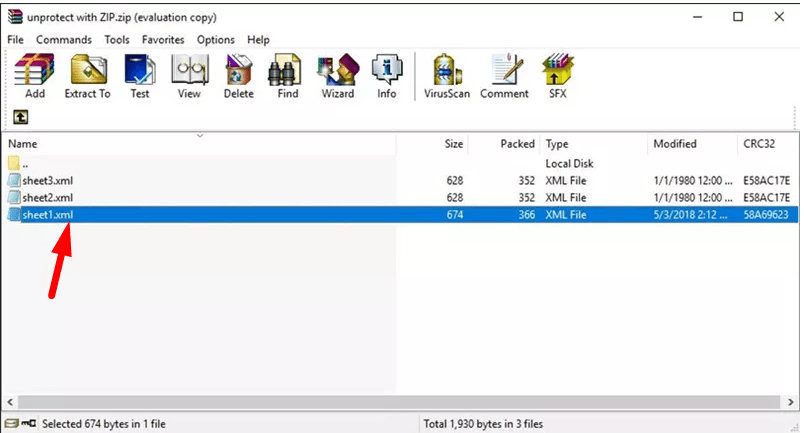
Step 4: Either open up the converted zipped archive Excel file or extract it into a folder using the 7-ZIP software. After doing so, you can see a list of folders, open the “xl” folder then open the “worksheets” folder. Inside “worksheets” folder you can see the list of worksheets that are available in the Excel document with the XML file extension as shown in the figure. Simply open the protected sheet you want to modify with the help of notepad or other text editor tool.
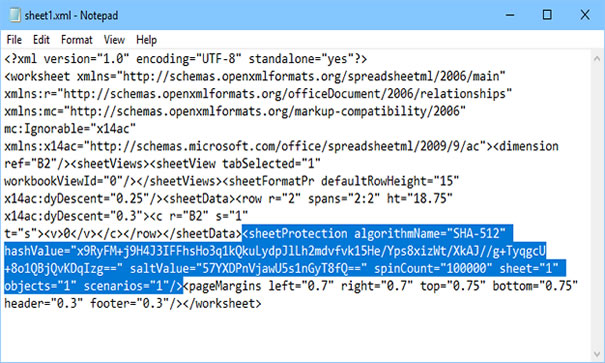
Step 5: Now from the text editor tool, select and delete the following tag from the code as highlighted below in the figure. After doing so, save and exit the worksheet from the text editor.
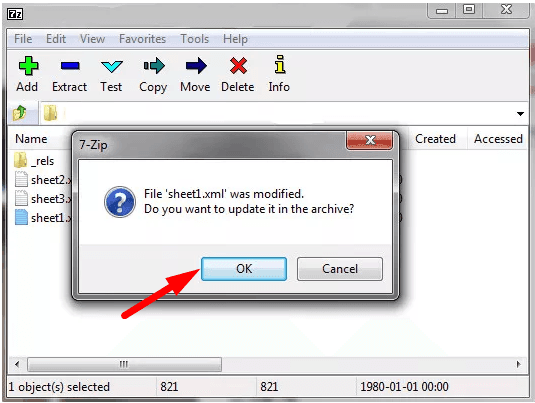
Step 6: If you have open the file in the archive then you will be prompted with a message of the worksheet that has been modified. Just click on OK button to update it in the archive.
Step 7: Now in order to view the modifications you have to change the zipped file back to the .xlsx extension format. You can see that now you can easily edit the worksheet.
Method 2: Unprotect Cells in Excel using VBA software (For 2010 and lower)
Microsoft VBA (visual basic for application) software is commonly used to open Excel worksheets for financial and other purposes but you can also unlock the cells of you excel worksheet using the VBA software that is of version 2010 or lower. In order to do so, follow the steps below.
Step 1: First and foremost, open your Excel file and then go to the password protected worksheet.
Step 2: Now from the keyboard, press the Alt key + F11 key simultaneously to open up the VBA editor.
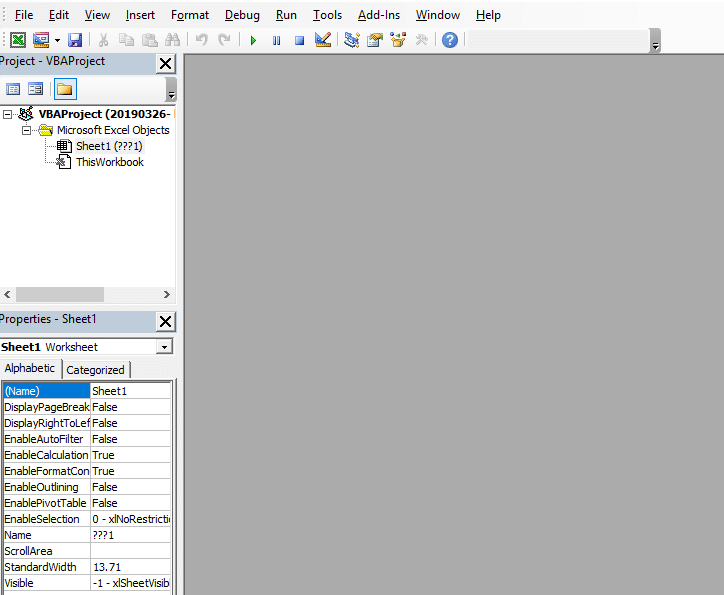
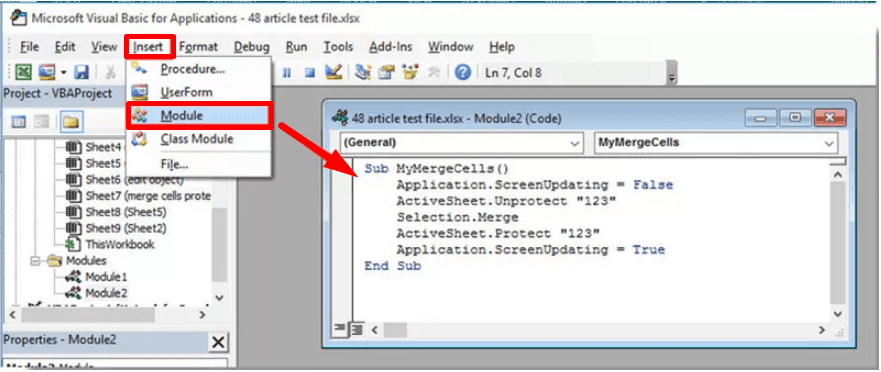
Step 3: From the VBA editor, right-click on protected “sheet” under the VBA project section (Project-VBA Project pane) from the navigation pane located at the most left corner. Now from the context menu hover your mouse on the insert option, another menu will be cascaded. Now choose the Module option. Or just select the protected “sheet” option and click on the insert option from the tools menu as shown in the figure, now you can simply select the Module option.
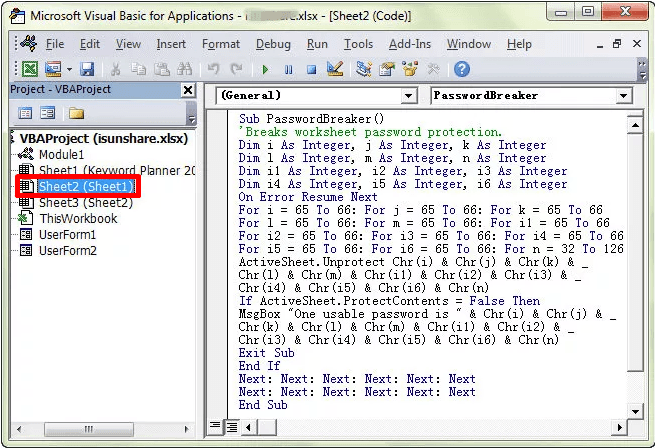
Step 4: Now open the password protected sheet by double-clicking it from the Project navigation pane and type in the following code as shown below in the window.
Step 5: Click on the Run button from the tool menu or press F5 from your keyboard, now click wait until the process is completed.
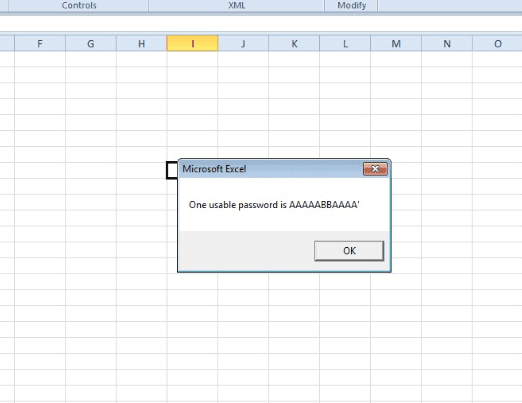
Step 6: After a few seconds you will be reported about a cracked password with some combination of ‘A’ and ‘B’ letters. This password will not be the original password that was used to lock the worksheet but it will always work. Just click on the OK button to unlock the sheet.
Bear in mind that this method will only run for the Excel files that are created in 2010 or lower version. So if your Excel file is created in above 2010 version then you can always save the Excel file as 97-2003 workbook *.xls extension format in order to run a macro to unlock it. After unlocking you can convert it back to .xlsx extension format. Also, keep in mind that for running macro you have to run it individually on each sheet in order to make them unprotected from the password.
Method 3: Unprotect Cells using Excel Password Recovery tool
If you have failed to manipulate the above methods then this is the best solution for you. Excel Password Recovery that can help you to recover not only your Excel file password but also helps in unlocking the protected cells in Excel sheets. This Excel password recovery tool works on MS Excel version 2003 and above. So in order to unprotect cells using excel password recovery tools, follow the steps below.
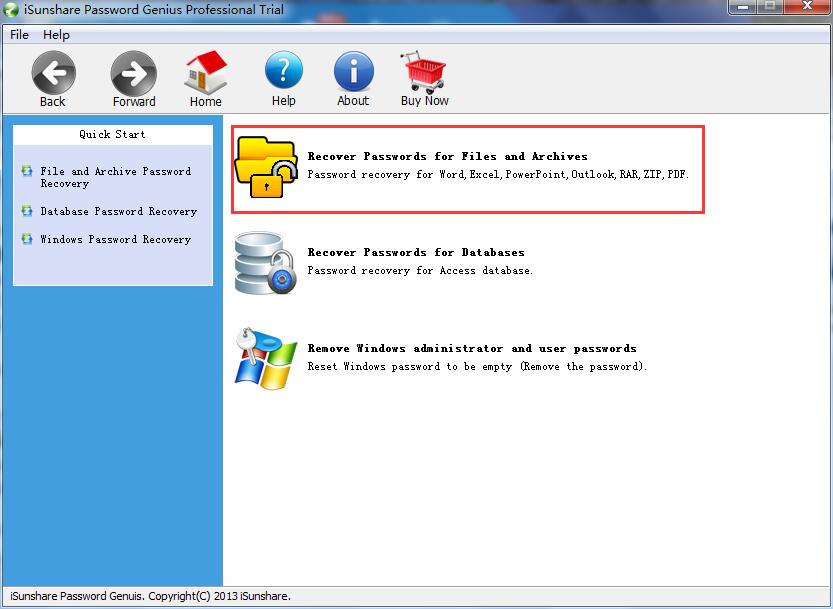
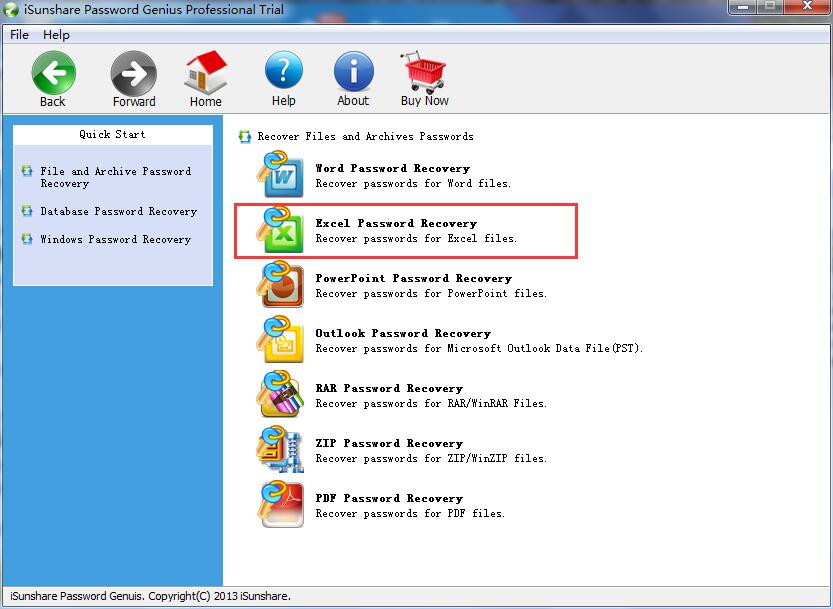
Free Download Buy NowStep 1: Go on and download the Excel Password Recovery tool and install it on your computer. After the successful installation, open and launch the iSunshare Password Genius Professional tool and select the “Recover Passwords for Files and Archives” from its Home user interface as shown in the figure.
Step 2: After opening the “Recover Passwords for Files and Archives” option, you can see a list of solutions, just select the “Excel Password Recovery” option as shown in the figure.
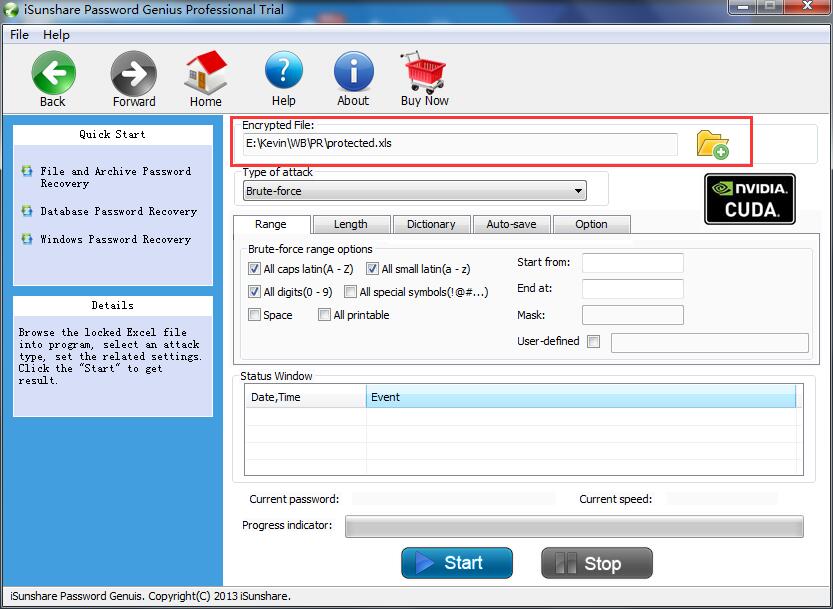
Step 3: Now under the Encrypted File section, click on the folder icon to add the Excel file for which you want to unlock cells for as shown in the figure.
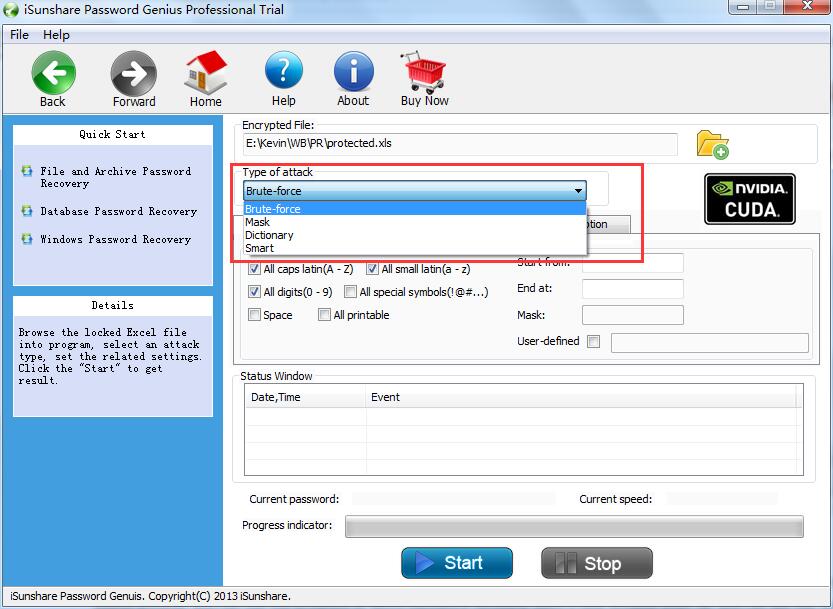
Step 4: Now click on the Type of Attack dropdown menu, and select the option that suits your criteria of the password recovery as shown in the figure.
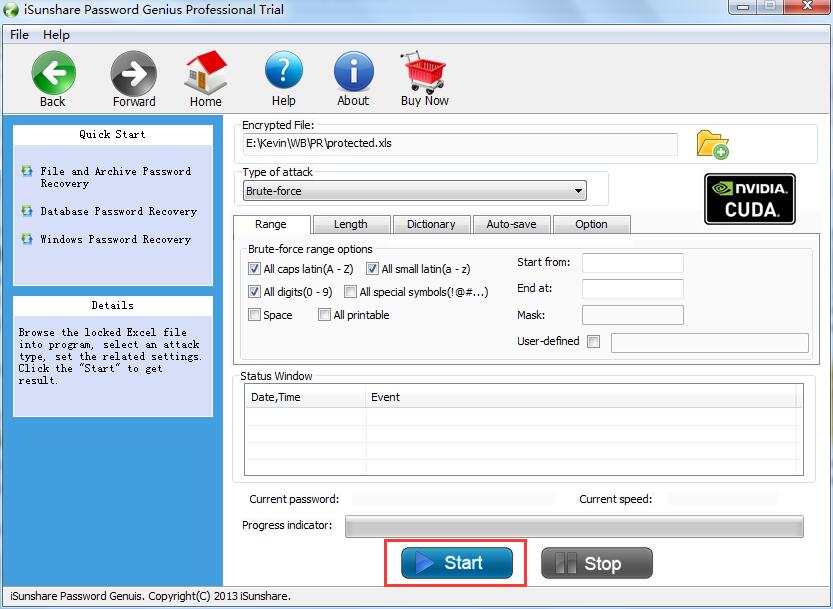
Step 5: Now click on the start button to begin the recovery process that will unlock the protected cells of your Excel file as shown in the figure.
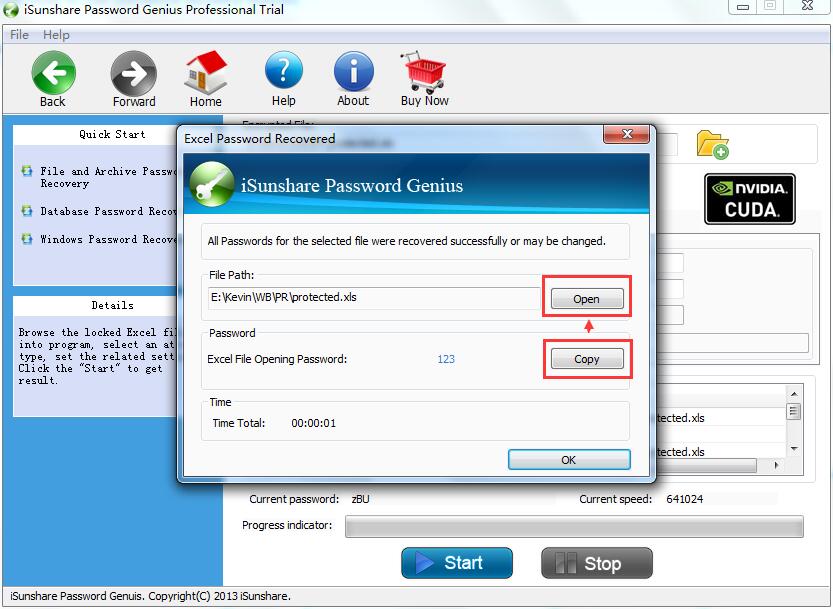
Step 6: After a few seconds or minutes you will see a pop-up message which will prompt you that the passwords for the file has been successfully recovered or may be changed. You can copy the password by clicking the Copy button or open the recovered file to view the Excel file by clicking on the Open button.
Conclusion:
That’s it hope this article has helped you learn and understand how to unlock cells in Excel. We have shown you 3 most useful and helpful methods form which you can easily unprotect the cells in Excel. In all the methods discussed, unprotecting cells using Excel password recovery is the best solution of them all, as it just takes few clicks and time to not only recover your Excel file password but also unlocks it protected cells of the Excel file. But you can always choose any of the methods that fit your requirement to unlock cells in Excel file.
Free Download Buy Now